Guides
Watch it, or read it.
Four short, narrated walkthroughs — installing SofaCode on your computer, pairing your phone, driving your agent day to day, and flashing a SofaNode. Every one has the exact same steps written out beside it, so you can press play with the sound on, or just read. Nothing autoplays.
01 On the computer
Install the daemon and the extension
SofaCode has two halves on your computer: the daemon, which your
phone talks to, and the VS Code extension, which drives your editor. The one command below
installs both, in about a minute, and nothing phones home. It is not root-free on every platform, and
it asks before any of it: on Linux it always asks for your password to add xdotool +
wmctrl (prompt delivery, not audio), and separately asks whether to add the optional
computer mic bridge and — only for SofaNode pointer control — a udev rule; on macOS Homebrew asks
whether to install the optional BlackHole audio driver. The script prints the full list, for your
platform, before it does any of it.
The mic-bridge audio driver is optional — the installer asks; SOFACODE_AUDIO=yes|no answers for scripts.
-
Run the installer — one command
macOS and Linux use the shell script; Windows uses the PowerShell one. It needs Python 3.10 or newer already installed and stops without changing anything if it cannot find one — the
python3macOS ships is 3.9, so a stock Mac needsbrew install python@3.12first. It then fetches the daemon (checksum-verified), builds a virtual environment in~/.sofacode, installs the VS Code extension and your Claude Code hooks, putssofacodeon your PATH — appending a line to your shell profile — and registers a login service. On Linux it always installsxdotoolandwmctrlwith sudo (they focus VS Code windows, not audio), then asks whether to also addpulseaudio-utils+portaudio, the optional computer mic bridge; on macOS it asks the same before installing BlackHole and PortAudio through Homebrew. Windows has no equivalent to install either way — see the mic-bridge step below. The ring dictates on the phone by default either way — installing the bridge only makes it possible to turn on Ring tap streams to the computer later (Settings › Speech); a SofaNode keeps its chimes, spoken replies, sessions and approvals regardless. -
Check the VS Code extension
The installer already added it — it is not on the VS Code Marketplace, it ships as a
.vsixfrom our own download host, and the install needs it: without the extension there is no window for a prompt to appear in. It is skipped only when VS Code'scodecommand is missing from your PATH, and it says so; if that happens run Shell Command: Install 'code' command in PATH from the Command Palette and re-run the installer. It finds the daemon on the same machine — no configuration. Down in the corner, the status bar reads SofaCode · Connected. Every command lives in the Command Palette — connect, disconnect, logs, settings — never buried in a config file. -
Verify it works
Two ways to know: the extension's status, and the daemon's own health check. Run
sofacode doctor, or open the status endpoint in a browser. What you want to see is your VS Code window listed — a window shows up once the extension connects. If that list is empty, that is the whole answer to "my prompts never arrive." -
Windows only — the computer mic bridge
The computer mic bridge is optional, and buys you exactly one thing: the option to have the deck's ring transcribe on this computer instead of the phone — the ring dictates on the phone by default either way. Windows has no equivalent the installer can set up for you, so if you want it, grab VB-CABLE from VB-Audio, run the setup as administrator, then reboot, point your assistant's mic at CABLE Output, and turn on Ring tap streams to the computer in Settings › Speech. Skip it and the ring keeps dictating with the phone's own speech-to-text — typed chat, phone dictation, and a SofaNode's chimes, spoken replies, sessions and approvals all need none of it.

sofacode on your PATH.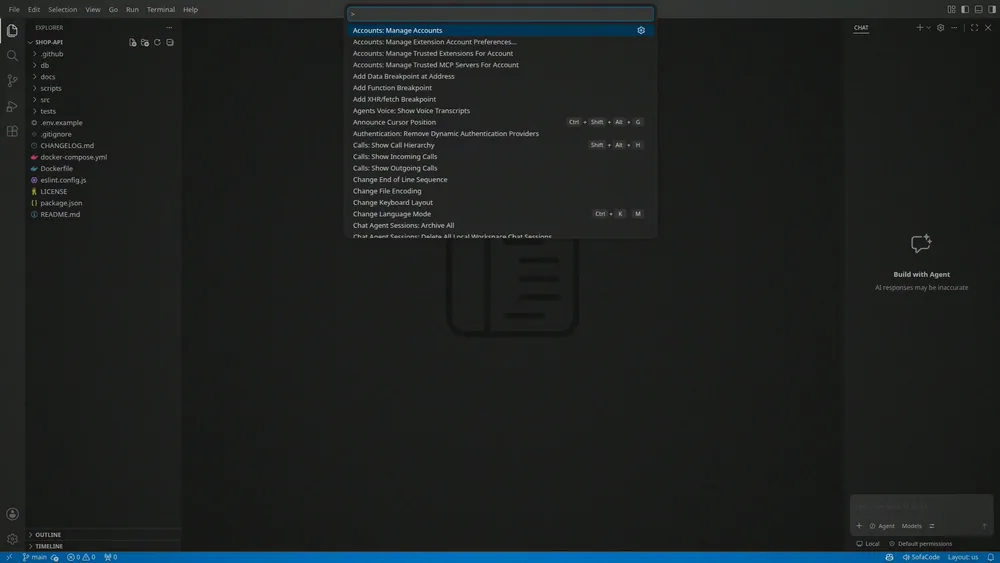

sofacode doctor and the status endpoint confirm the daemon is reachable — and that your editor window is listed.02 On your phone
Pair your phone, and drive your agent
Your coding agent lives in VS Code on your machine. SofaCode makes your phone the front end for it — Claude Code, GitHub Copilot Chat, OpenAI Codex, or a model on your own GPU — and none of it routes through our servers.
Dictation uses your phone's own speech-to-text by default; streaming to the computer's mic is a Settings switch.
-
Pair
Start the daemon on your computer; it puts a QR on screen. Point the app at it, and that is the pairing done. The app holds a token now — just for that machine. No account, no sign-up, nothing of yours on our side. No camera? Enter the 8-digit code instead.
-
Read the deck
One circle that tells you the truth about your agent: Ready, Working, Needs you — with a live waveform while you talk. It follows your active VS Code window: alt-tab on the computer and the phone already shows that session.
-
Talk
Tap and talk. Your words land in the agent's prompt, on your machine — your daemon transcribes them, on your hardware. Hold to submit, then put the phone down. It reads the reply back to you.
-
Approve
When your agent needs permission to run something, that prompt comes to you — wherever you are (Claude Code and Codex; Copilot Chat asks in VS Code). Tap the check to allow, the cross to deny, straight off the deck, the notification, or the card itself. First answer wins, across every device you have paired.
That is the whole loop — talk, approve, ship. Want that deck as a real object on your desk? That is the SofaNode.


03 Every day
The four screens you will live in
Once it is paired, everything is behind the deck. Learn a handful of gestures and you are done — tap to talk, hold to send, and swipe to move between screens.
Recorded on 2.29 — since then the Tasks pill became a small floating button over the chat (and over the deck's box, where it swaps the box to the task list), the list opens as a card you dismiss by tapping outside, and the deck gained a draggable divider between ring and box. A fresh cut follows the release.
-
Chat — tap the quick look, or open session
The live transcript, streaming as your agent works — not a summary after the fact. Tap to jump to newest, hold to have it read aloud, turn the dial or scroll to go back.
-
Tasks — the Tasks pill inside the chat
The agent's plan: running task in bold, finished ones struck through, ticking off in real time. This screen tells you one thing — keep waiting, or go make coffee.
-
Sessions — swipe right
Every session your agent is running, across every machine you have paired. Tap one and everything follows — the deck, the transcript, the approvals. Roll past the end of the list and you are on the next machine. (Swipe left for the menu and settings.)
-
Files & terminal
A file browser to read anything in the project, attach it to your next prompt, or upload from your phone — and a real terminal, on your machine, from your hand. Both go straight to your daemon; nothing is copied anywhere.
The SofaNode is the same deck, in a box on your desk — the same swipes, plus a rim you can turn. On Sessions, turn the rim to move, tap a row for its actions (follow, allow or deny when it is waiting on you, permission mode, New session in that window, play or clear a held reply) and hold to follow it. Menu > New session starts one in the focused VS Code window. On Tasks the running task reads brightest with a pulsing dot; done ones dim.


04 The hardware
Flash your SofaNode from the browser
Your SofaNode ships unflashed. The first thing you do is flash it, right from your browser — no toolchain, no terminal, no Python. After that first flash it keeps itself current over the air, and you should not need the flasher page again.
-
Open the flasher and sign in
You need two things: Chrome (or another Chromium browser) and a USB-C data cable. Open the web flasher and sign in with the username and password from your order — the page is gated to owners.
-
Plug it in and pick the port
Connect the Node with a real USB-C data cable. Chrome asks which serial port; pick the one that appears when you connect it — it shows up as an ESP32-S3 / USB JTAG serial port. Nothing appears? It is almost always the cable: charge-only cables are the number-one reason this fails.
-
Flash — it writes all four parts
Click Flash SofaNode. It writes the bootloader, the partition table, the boot data, and the firmware itself — all four. The bootloader carries the flash and memory config, so writing only the firmware would leave the Node running on a fraction of its memory; the flasher always writes everything. Your pairing survives this — updates never wipe it.
-
Set Wi-Fi and timezone
Same page. Pick your network, type the password once, and set your timezone, so the Node comes up ready to pair. You could do this on the Node itself with the character wheel, but typing a long password on a dial is something you will want to do exactly once.
-
After that, it updates itself
The Node checks for updates at boot and installs them itself; the Update row in its menu checks on demand. You should not need the flasher page again — but it is there for a manual re-flash when you do.
This is an interim cut. The live serial-port picker and the flashing-progress log need a Node cabled to the machine to film, so they are written out in full above but not yet shown on screen. Everything else — signing in, the flasher page, the four-part write, and setting Wi-Fi and timezone — is exactly what you will see.


More on the hardware — every screen, the gestures, the specs — is on the SofaNode page and in the documentation. If a step here did not go the way it reads, tell us; if the Node should do something it does not, ask for it.
Reference
What works with which assistant
Every face of SofaCode — the phone, the watch and the SofaNode — drives Claude Code, GitHub Copilot Chat and OpenAI Codex, and this table says exactly what each one can do from each of them. It runs in Visual Studio Code, and — in beta — in the VS Code editor you already use: Cursor, VS Code Insiders, VSCodium, Devin and Antigravity.
| Feature | Claude Code | Copilot Chat | Codex |
|---|---|---|---|
| Live transcript | Yes | Yesreplaces edited turns in place | Yes |
| Working / ready / needs-you state | Yeshooks | Yeschat journal, up to a minute behind | Yeshooks + session log |
| Approve or deny from the device | Yes | Partialtool confirmations only; VS Code does not raise them to the daemon | Yes |
| Questions: pick an answer | Yes | Partialshown as text; answer by typing | NoCodex does not expose them |
| Stop the current turn | Yes | Yes | YesEscape into the Codex composer |
| Send a prompt, steer while it works | Yes | Yesnative chat submit | Yes |
| New session | Yes | Yes | Yes |
| Model picker | Yestyped /model | Yesnative list, switches mid-chat | Yeslist + default for new sessions |
| Permission mode: see the live mode | Yes | Nonot readable | Yes |
| Permission mode: change it per session | YesShift+Tab cycle | No | NoCodex has no per-session lever |
| Permission mode: set the machine default | Yes | Yes | Yes |
| Skills and slash commands | Yes | Yesprompt files + participant commands | Yes$skills, prompts, commands |
| Tasks checklist | Yes | Yes | Yes |
| Thinking shown live | Yes | Yes | Yessummaries |
| Subagent count | Yes | No | Yes |
| Token stats | Yes | Partialinput and output only | Yes |
| Usage and quota | Yes | Nonothing on disk to read | Yes |
| Memory file editor | YesCLAUDE.md | Yes.github/copilot-instructions.md, project only | YesAGENTS.md |
| Computer-mic voice from the ring | YesClaude Code dictation | YesVS Code Speech | Nophone dictation still works |
| Read replies aloud, chimes, notifications | Yes | Yes | Yes |
| Terminal, files, archive, favorites | Yes | Yes | Yes |
| Local models (LM Studio, Ollama) | — | Yesthrough Copilot's model picker | — |
| Feature | Android | iPhone / iPad | Wear OS | Apple Watch | SofaNode |
|---|---|---|---|---|---|
| Live transcript | Yes | Yes | Yes | Yes | Yes |
| Working / ready / needs-you state | Yes | Yes | Yes | Yes | Yes |
| Approve or deny from the device | Yes | Yes | Yes | Yes | Yes |
| Questions: pick an answer | Yes | Yes | Yes | Yes | Yes |
| Stop the current turn | Yes | Yes | No | No | No |
| Send a prompt, steer while it works | Yes | Yes | Yes | Yes | Yes |
| New session | Yes | Yes | Yes | Yes | Yes |
| Model picker | Yes | Yes | No | No | No |
| Permission mode: see the live mode | Yes | Yes | Yes | Yes | Yes |
| Permission mode: change it per session | Yes | Yes | Yes | Yes | Yes |
| Permission mode: set the machine default | Yes | Yes | No | No | No |
| Skills and slash commands | Yes | Yes | No | No | No |
| Tasks checklist | Yes | Yes | Yes | Yes | Yes |
| Thinking shown live | Yes | Yes | Yes | Yes | Yes |
| Subagent count | Yes | Yes | Yes | Yes | No |
| Token stats | Yes | Yes | No | No | No |
| Usage and quota | Yes | Yes | No | Yes | Yes |
| Memory file editor | Yes | Yes | No | No | No |
| Computer-mic voice from the ring | Yes | Yes | Yes | Yes | Yes |
| Read replies aloud, chimes, notifications | Yes | Yes | Yes | Yes | Yes |
| Terminal, files, archive, favorites | Yes | Yes | No | No | No |
| Local models (LM Studio, Ollama) | Yes | Yes | No | No | No |
Works in Visual Studio Code. Support for other editors is in beta: Visual Studio Code - Insiders, VSCodium, Cursor, Devin (formerly Windsurf) and Antigravity (Google's IDE). Copilot Chat features apply only where Copilot Chat exists (VS Code and Insiders).